In this first entry of the FACTS Cosplay Tutorials, ECG Preliminary winner and expert cosplayer Shien Cosplay is showing you how to make the Banuk Champion Bow from the Frozen Wilds DLC of Horizon: Zero Dawn out of Sintra.
So if you’re looking for a futuristic bow or if you’re ready to make your own Aloy cosplay costume, then Shien’s cosplay tips and tricks will be invaluable information for you.
1. A heatgun to manipulate the shape and slightly bend the plastic 2. A dremel. This is to clean the edges and as I’m a messy worker I also use it to even things up. 3. Knives. Small tip: the smaller knives make it easier to cut through 5 mm sintra. 4. Super glue. I can recommend this brand! Although I have heard epoxy glue might actually work too and hold even longer. 5. Foamcoat to seal seams and gaps. 6. Very important but not pictured here: A dust mask and safety glasses. 7. Sanding paper 8. Sintra. I used exclusively 2 mm and 5 mm as 10 mm is simply too thick for me to cut and I had no proper tools to handle it. These two sizes are doable for everyone.
Not pictured here for painting and weathering:
Primer
Metallic spraypaint
Acrylic paint
Latex (toothpaste works too)
Oil paints
Very cheap brushes (for weathering)
Varnish
Getting started
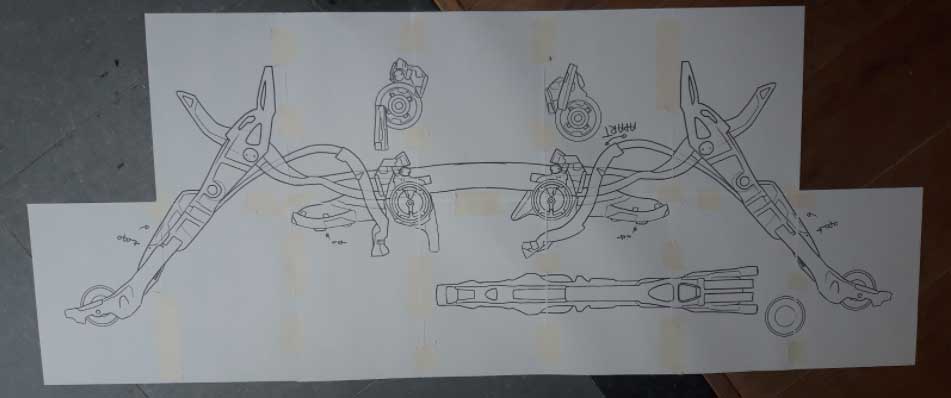
Make a template
“First step: make a template. Because of a lack of clear references on the internet, I used the handy Photo Mode to capture in-game screenshots of every angle. After I then traced them to Photoshop, I printed out the template and used it as a reference every time I needed to cut a piece.
My template wasn’t complete, but I also printed some screenshots and kept them on my work table as reference. This way I had more of an understanding of how the piece looks in 3D as well. The most difficult part was converting a 3D game object into a 2D template only to convert in a 3D real life object again. But it is absolutely worth doing.”
Cutting process
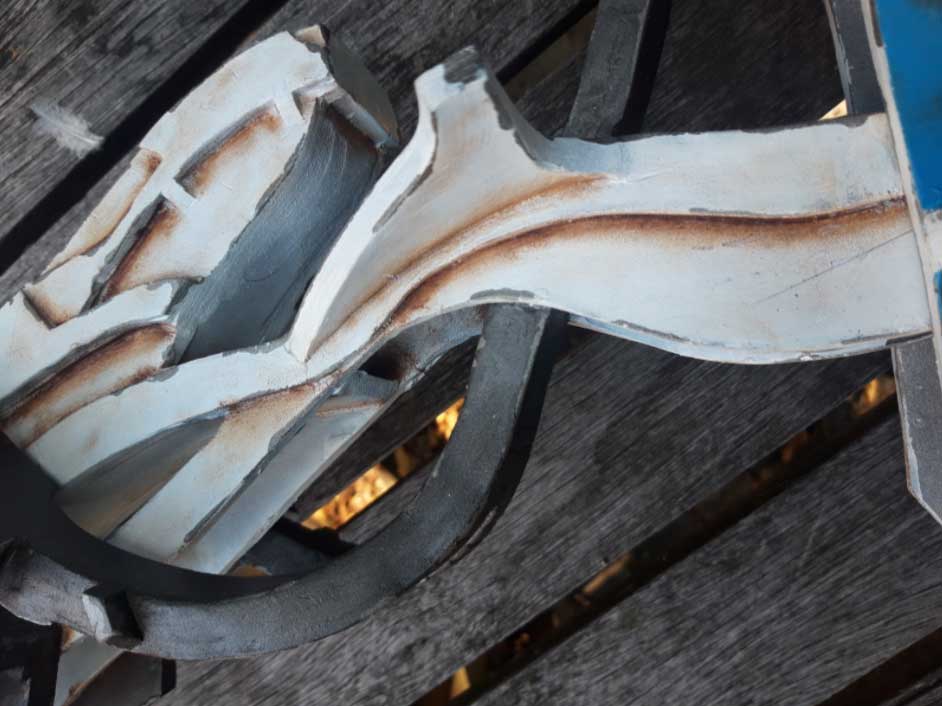
“I cut the pieces of Sintra with a very sharp knife and layer the pieces on top of each other to ‘build’ a bigger piece. To make it extra firm, you can sand both sides of the Sintra before glueing it together. This way the glue sticks better to the tiny scratches on the surface left by the sandpaper. I usually use rougher sandpaper for this. Continue to cut, glue and layer until you have a good base. This is a long and monotonous process.
You might also have to heatshape some parts to make them fit, but be careful while heatshaping Sintra. If you make it too hot, the volume of the material will increase. You can easily sand the edges down, with either a dremel and/or normal sandpaper.
Cosplay tip: why Sintra ® (PVC sheets)?
Shien Cosplay finds that it’s somewhat similar to working with EVA foam, but sintra is stronger (although also harder to cut) and it doesn’t have to be covered in worbla if you need extra strength. This trait makes it ideal for these types of design. Be careful, it can still break.
For more info on Sintra and where to buy it, check this page.
Now you can really ‘build’ your prop. Start by getting the base down and add more and more details afterwards. If your prop exists out of multiple pieces – like this bow – try to fit them together regularly.”
Adding details
“Dremel the edges of your prop. It gives a much cleaner look when the edges are somewhat rounded. Make sure to follow the direction of the rotary tool not to damage the plastic.
For the engravings I used an engraving tool for the dremel. This also works with a pen if you press hard enough, but make sure it’s strong enough.
The middle part of the bow and ‘boxes’ are basically hollow. I glued some strips inside to make it stronger. Add details on the base until you are satisfied. If you’re a messy worker like me, you’ll have quite some filling and sanding to do later, so don’t worry if it looks like a complete mess. It’s still possible to add more details if you discover them later on, or if you want to add some of your own. This was the most time-consuming part. On to the colours!”
Adding colours and weathering
“I first spray painted the parts with plastic primer before covering them in a metallic color. It is very important that this metallic color is spraypaint! When the spraypaint is dry you can start covering the edges with latex (I got this technique from my friend Idromy’s costumes). Other, cheaper alternatives might be toothpaste and even mustard. This will create your ‘chipping effect’.
It is very important to use acrylic paint for the top layers. if you use spraypaint again, this technique will likely not work. It’s great if you have an airbrush to do this, if not you will just have to thin your paint (unless you’re using the acrylic ink) and apply a lot of layers to avoid brushstrokes as much as possible. Wait until the paint is dry and enjoy the extremely satisfying moment of peeling off the latex. I add extra ‘battle damage’ by scratching and cutting the surface a bit with a crafting knife.
Now your prop is ready for weathering. I used oil paint for this. Oil paint takes longer to dry, but it gives a pretty realistic effect. After painting you can seal the prop with varnish.“
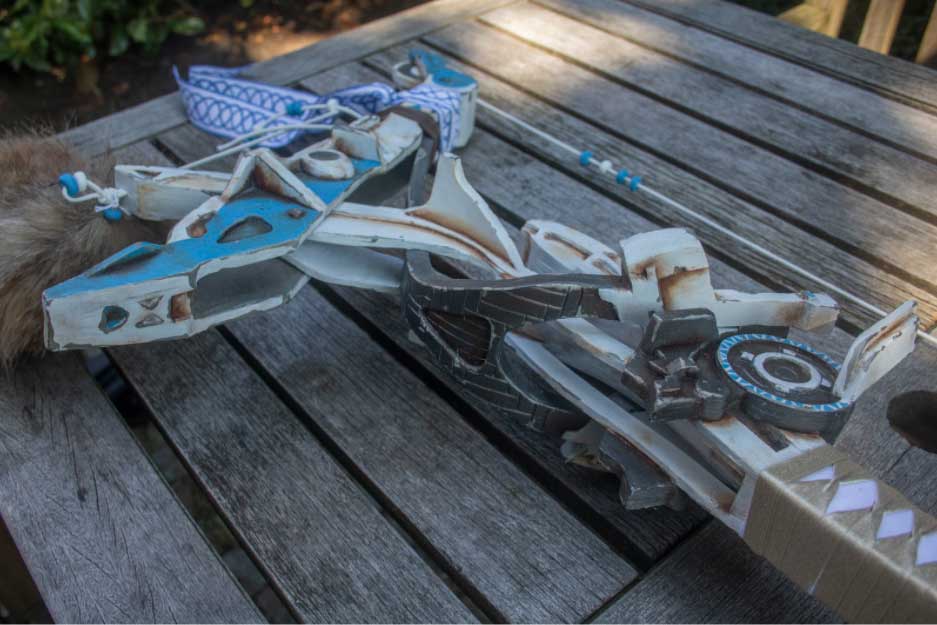
Assembly and decoration
“After some tough work everything fits together! I tried to make the parts ‘move’ and attached them by drilling holes to the parts and putting a wooden dowel in them. In theory it must work perfectly; but in reality the middle part was a bit too wide which made it too fitting and decreased the mobility. Don’t make my mistake and make sure there’s still enough wiggle room!
Because of a miscalculation the holes were added on a place I didn’t intend them to be, as it’s important to make them in the most dense areas possible for more stability. My idea was to cover them up with the big ‘screw’ on the references. Instead, I covered them up with foamcoat and repainted them to hide them as well as possible.
And lastly you can finally add the decorations. I painted fabric with fabric paint, made beads out of foamclay and used the same technique used with katanas for the handle of the bow. Just make sure to get yourself enough ribbon. I thought my 3 meters of metallic satin ribbon was going to be too much, but I almost didn’t make it.
The elastic is 3 mm wide in diameters. It’s very stretchy so you don’t have to put a lot of pressure on the bow. I also used worbla covered in leather straps for decoration.
The tail is made out of faux fur. The tip has been painted with acrylic ink. The ribbon hanging down is painted with blue textile paint you can find in your craft store.
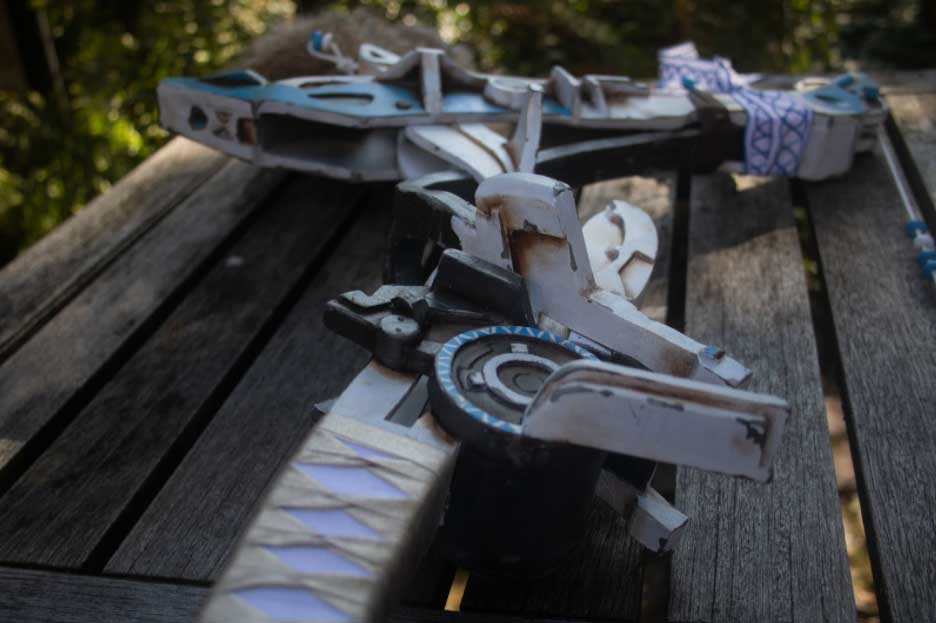
For reference, I’ve added some detail shots to finish the tutorial.